Create a GitHub Repository
GitHub is a powerful platform for version control and collaboration, making it essential for developers and teams. Creating a GitHub repository is the first step in managing your code effectively. In this article, we’ll walk you through the process of setting up a new GitHub repository from scratch.
What is a GitHub Repository?
A GitHub repository (or "repo") is a storage space for your project’s files, including code, images, and documentation. It allows you to track changes, collaborate with others, and maintain different versions of your project.
Prerequisites
Before you start, ensure that you have:
- A GitHub account. If you don’t have one, sign up here.
- Git installed on your computer (optional, but recommended for local development). You can download it from git-scm.com.
Step 1: Log in to GitHub
- Go to github.com.
- Click on the Sign in button in the top right corner and enter your credentials.
Step 2: Create a New Repository
- On your GitHub homepage, click the + icon in the top right corner next to your profile picture.
- Select New repository from the dropdown menu.
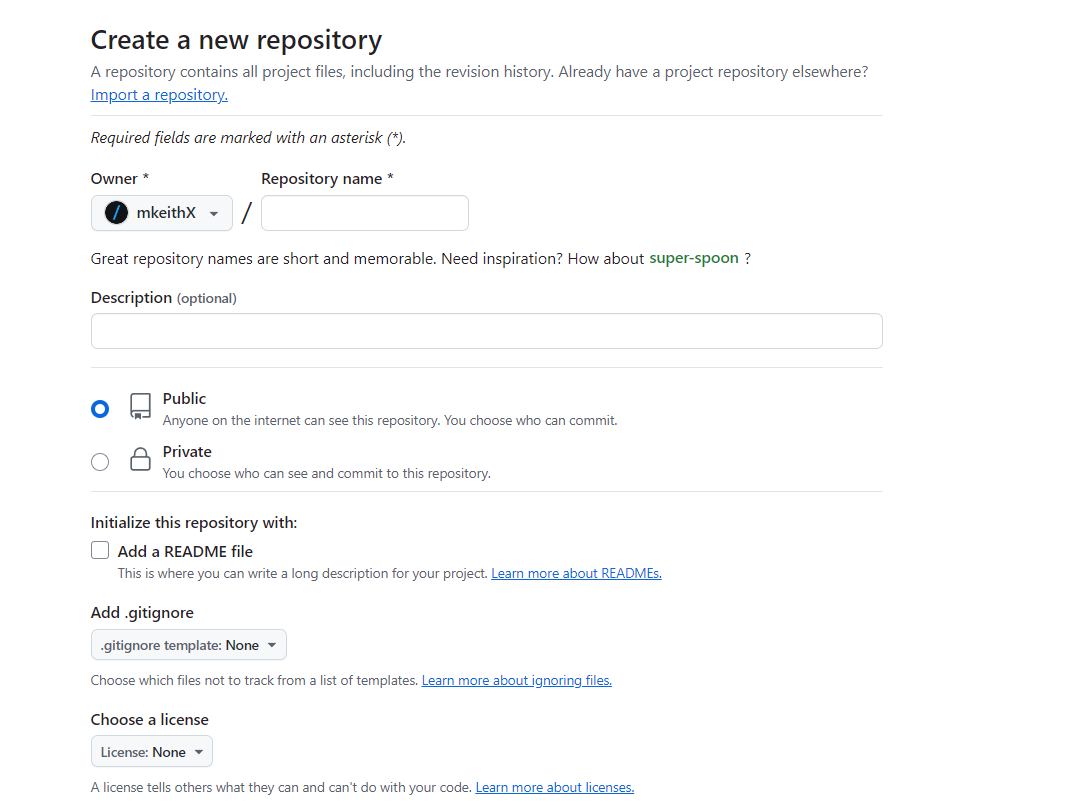
Step 3: Configure Your Repository
Fill out the necessary information for your repository:
- Repository name: Choose a unique name for your project. This name will be part of the repository's URL.
- Description (optional): Provide a brief description of your project. This helps others understand what your repository is about.
- Public or Private:
- Public: Anyone can see this repository. You can choose this if you want to share your project with the world.
- Private: Only you and people you invite can see this repository. This option is great for personal projects or sensitive code.
- Initialize this repository with a README: Check this box if you want to create a README file. This file is essential for explaining your project and can be updated later.
- Add .gitignore (optional): This file tells Git which files to ignore. You can select templates for different languages to avoid committing unnecessary files.
- Choose a license (optional): Select a license for your project if you plan to make it public. This informs others how they can use your code.
Once you’ve filled out the necessary information, click the Create repository button.
Step 4: Clone Your Repository (Optional)
If you want to work on your project locally, you can clone your repository to your computer.
-
On your repository page, click the green Code button.
-
Copy the URL under Clone with HTTPS (or SSH if you prefer).
-
Open your terminal or command prompt and run the following command:
git clone <repository-url>
Replace <repository-url> with the URL you copied. This command will create a local copy of your repository on your machine.
Step 5: Start Adding Files
Now that you have your repository set up, you can start adding files:
Via GitHub: You can upload files directly through the GitHub web interface. Navigate to your repository and click on the Add file button, then select Upload files or Create new file.
Via Git: If you cloned the repository, add your files locally. Use the following commands in your terminal:
git add .
git commit -m "Initial commit"
git push origin main
This will add your files to the staging area, commit them with a message, and push them to GitHub.
Step 6: Collaborate and Manage Your Repository
Now that your repository is created and populated, you can collaborate with others. Here are a few tips:
Invite Collaborators: Go to your repository, click on Settings, then Manage access, and invite collaborators by their GitHub username. Create Issues: Use the Issues tab to track bugs or feature requests. Branches: Use branches to work on different features without affecting the main codebase. You can create a branch via the GitHub interface or command line.
Summary
Creating a GitHub repository is a straightforward process that sets the foundation for managing your projects efficiently. Whether you’re working solo or collaborating with a team, GitHub provides the tools you need to succeed. Now that you have your repository set up, explore its features and make the most out of your development experience!